DIY Lean-To Shed Build: Practical Instructions for Outdoor Shed Projects
Building your own lean-to shed offers a rewarding blend of practicality and creative expression. This project allows you to customize storage solutions precisely to your needs, while simultaneously enhancing your property's aesthetic appeal. This guide provides a comprehensive, step-by-step walkthrough, empowering you to tackle this project with confidence, even as a novice DIY enthusiast. Remember to always prioritize safety by wearing appropriate protective gear throughout the entire process.
Planning Your Lean-To Shed
Before you grab your tools, meticulous planning ensures a smooth build. First, determine the ideal location for your shed. Consider proximity to power sources, water access (if needed), and its visual impact on your property. Next, decide on the dimensions. A smaller lean-to might suffice for storing gardening tools, while a larger structure accommodates bicycles or outdoor furniture. Sketch your design, noting precise measurements for each component â€" this detailed blueprint guides you through the entire construction process. Finally, acquire all necessary building materials. This includes lumber (pressure-treated is recommended for longevity), roofing materials (asphalt shingles are a popular and cost-effective choice), fasteners (galvanized nails and screws are ideal for outdoor use), and any additional features such as windows or doors.
Choosing the Right Materials
Selecting durable materials is crucial for a long-lasting shed. Pressure-treated lumber resists rot and insect damage, making it an excellent choice for the frame and base. Consider the weight capacity you need for your shed, as this impacts the type and size of lumber you should purchase. For roofing, asphalt shingles provide a reliable and affordable option, offering excellent weather protection. Choose a shingle color that complements your home and landscape. Always verify that your chosen materials meet local building codes.
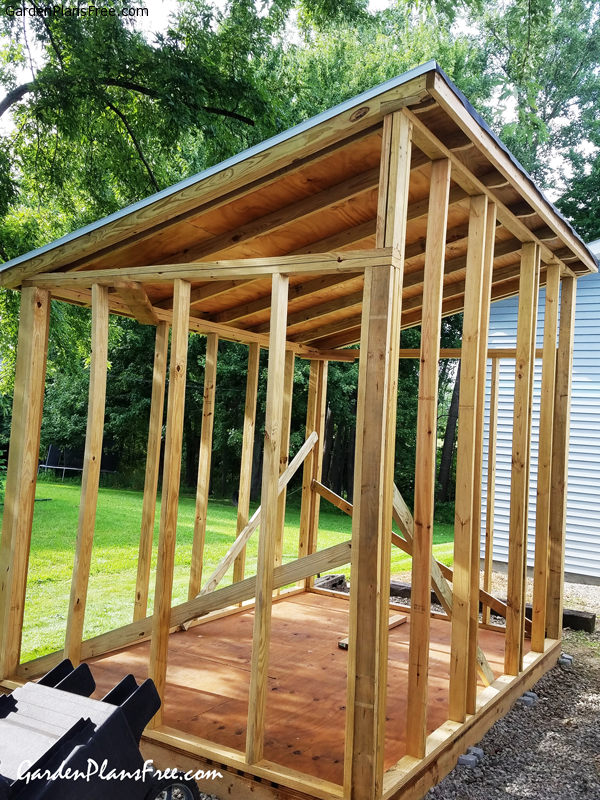
Foundation and Frame Construction
Begin by preparing a level foundation. A simple concrete slab provides stability, but a well-packed gravel base works equally well for lighter sheds. Once your foundation is ready, construct the frame. Use your detailed plan as your guide, precisely cutting and assembling the lumber. Ensure that all corners are square and the frame is level. Secure the frame using galvanized nails or screws, paying close attention to proper fastening techniques for maximum strength and stability. Consider adding bracing to enhance structural integrity.
Constructing a Stable Frame
The frame forms the backbone of your lean-to. Start by assembling the main support beams, ensuring they are perfectly level and plumb. Use a spirit level frequently to maintain accuracy. Once the main beams are secured, carefully attach the side and top support beams, ensuring they are appropriately braced. Remember to pre-drill holes before driving screws to prevent wood splitting. A sturdy frame is paramount for a safe and functional shed.
Roofing and Finishing Touches
With the frame complete, install the roofing materials according to the manufacturer's instructions. Start at the lowest point of the roof and work your way up, ensuring each shingle overlaps correctly for optimal weather protection. Once the roof is finished, add any finishing touches, such as adding doors or windows, painting or staining the exterior, and installing shelving or other interior features to meet your storage needs. Consider adding a layer of waterproof sealant around the base of the shed to further protect against moisture damage.
Adding the Finishing Touches
Finishing touches elevate your DIY lean-to shed from a functional structure to a valuable asset. Consider adding a simple door for security and ease of access. Painting or staining the exterior provides protection from the elements and adds aesthetic appeal. Finally, don't forget the interior; installing shelving maximizes storage capacity, keeping your tools organized and easily accessible.
Essential Tools and Safety Precautions
Gather necessary tools beforehand. You'll need a measuring tape, saw (circular saw or hand saw), hammer, drill, level, shovel (for foundation prep), and safety glasses, hearing protection, and work gloves.
Safety is paramount. Wear appropriate safety gear at all times. Use caution when operating power tools, and never rush the process. Take breaks as needed to avoid fatigue. Remember to adhere to all local building codes and regulations.
Safety First Checklist:
- Wear safety glasses
- Use hearing protection when operating power tools
- Wear work gloves to protect your hands
- Use caution when handling sharp tools
- Take breaks to avoid fatigue
Sign up here with your email
ConversionConversion EmoticonEmoticon
Note: Only a member of this blog may post a comment.